When you think you have seen it all. You didnt!
Check out this new picture of rapper Eminem with a mask covering his face while out and about in NYC, New York this last weekend.
Weird no? Seem’s like he just got adopted by pop king Michael Jackson.

When you think you have seen it all. You didnt!
Check out this new picture of rapper Eminem with a mask covering his face while out and about in NYC, New York this last weekend.
Weird no? Seem’s like he just got adopted by pop king Michael Jackson.

Labels: Hot Gossips, Music Gossip
Posted by it's me.. at 4:49 AM 0 comments
Rob Lowe has settled a lawsuit brought on by his former nanny.
Jessica Gibson had sued the Brothers & Sisters star and his wife, accusing them of sexual harassment, among other offenses, in April 2008.
This course of action took place a week after the Lowes sued Gibson for allegedly breaching the confidentiality clause she signed when she went to work for the couple; they claimed she conspired to demand $1.5 million in exchange for keeping quiet about various pieces of dirty laundry.
In the end, neither party's attorneys revealed whether money was involved in the settlement, making the ending to this case as anticlimactic as Lowe's ending scene on The West Wing.
http://www.thehollywoodgossip.com/2009/05/rob-lowe-settle-lawsuit-with-jessica-gibson/
Labels: Hot Gossips, Tv Series Gossip
Posted by it's me.. at 4:49 AM 0 comments
He had a great voice, a great (albeit tragic) personal story and a great run on American Idol.
But Danny Gokey did not have what it takes to make the finals, as the singer was eliminated last night after solid, but unspectacular, renditions on Monday's performance show.
Ryan Seacrest caused our hearts to stop for a few moments last night, as he initially announced that Kris Allen had made it through to next week's finale.
That left Danny and Adam Lambert in the bottom two, as a nation feared the latter might actually not take his rightful place among the show's winner.
In the end, though, Ryan announced that over 88 million people voted, Lambert was safe and Danny was going home.
"This whole experience feels like a dream come true. American Idol has given me a whole new hope for my life," said Gokey during a video montage of his journey, reflecting on how far he's come since his wife passed away last July. "It's almost like a fairy tale story. You read about tragedies, and then you read about the triumph that comes through it - and I'm that person."
Relive Danny Gokey's American Idol experience above. Click on each image to enlarge it.
http://www.thehollywoodgossip.com/2009/05/american-idol-says-goodbye-to-danny-gokey/
Labels: American Idol, Hot Gossips
Posted by it's me.. at 4:46 AM 0 comments

Talk about making a statement…
Just one day after Donald Trump decided that Carrie Prejean could keep her Miss California crown - despite the fact that she didn’t reveal to the organization she posed for topless photos as a teenager - Shanna Moakler has resigned as the pageant’s director, Usmagazine.com reports.
“Since the press conference yesterday [Tuesday], I had a chance to think about what has taken place, and I feel that at this time it is in my best interest to resign from the Miss California USA organization,” Moakler tells the tabloid and adds: “I cannot with a clear conscious move forward supporting and promoting the Miss Universe Organization when I no longer believe in it, or the contracts I signed committing myself as a youth.”
We understand why Moakler doesn’t agree with Trump’s decision, but correct us if we’re wrong… Wasn’t Moakler Playmate of the Month for Playboy magazine in December 2001???
http://www.hotgossip.com/prejean-keeps-her-crown-miss-cali-pageant-director-resigns/6008/
Labels: Hot Gossips
Posted by it's me.. at 4:45 AM 0 comments

Pearl Jam bassist Jeff Ament, 46, is recovering after he was injured in a brutal robbery last month, Rolling Stone magazine reports.
Ament was reportedly arriving at a recording studio in Atlanta, GA, (where the band is recording their ninth studio album with producer Brendan O’Brien) when three masked assailants with knives attacked him and a colleague.
When Ament attempted to flee from the robbers, they chased him down and attacked him, leaving him with a nasty head wound.
The famous bassist was robbed of $3,000 in cash and more than $4,000 in goods. The police are still investigating the incident.
http://www.hotgossip.com/pearl-jam-member-recovering-after-brutal-robbery/6010/
Labels: Band Gossips, Hot Gossips
Posted by it's me.. at 4:42 AM 0 comments

Howard K. Stern as well as the two doctors, who all stand accused of supplying Anna Nicole Smith with the drugs that killed her, pleaded not guilty yesterday, Fox News reports.
The prosecutors claim the doctors gave the drugs to Stern, who then gave them to Smith. Stern, 40, Kristine Eroshevich, 61, and Sandeep Kapoor, 40, are facing six felony counts, including prescribing, administering, and dispensing a controlled substance to an addict. Each of them faces up to five years and eight months in prison if convicted.
We are no experts, but there seems to be something about Anna Nicole and all her prescription meds that don’t add up… Just consider this: According to Fox News, eleven prescription medications were found in Smith’s hotel room the same day she passed away. At the same time, more than 600 pills were missing from prescriptions that were less than five weeks old. Another weird fact is that most of the drugs were prescribed in the name of Stern, her lawyer/boyfriend, while none was prescribed in Smith’s own name…
We can’t shake the feeling that there was something fishy going on… What say you?
http://www.hotgossip.com/howard-k-stern-pleads-not-guilty-in-anna-nicole-drug-case/6012/
Labels: Hot Gossips
Posted by it's me.. at 4:41 AM 0 comments
I am JamesZilla. I write tutorials for various magazines and websites when I'm not designing gig posters, t-shirts, catalogues, magazine, etc.
Take a look at the image we'll be creating. Want access to the full PSD files and downloadable copies of every tutorial, including this one? Join Psd Plus for just $9/month. You can view the final image preview below or view a larger version here.
Our video editor Gavin Steele has created this video tutorial to compliment this text + image tutorial.
Job number one, as ever, is pooling your assets together. I got the man from iStockphoto here and the tree bark (courtesy of K. Tuck) from stock.xchng here.

Cut out the face using the Pen tool (set to Paths not Shape Layers). Cut and paste it into your blank canvas (1562 pixels by 1172 pixels at 300dpi). Open up the bark image, and import it into your working document. Resize and rotate the document as in the screengrab.

Use the Clone Stamp tool to fill in the rest of the texture. Avoid easily recognizable repetitions in the texture like the ones circled. Clone them out. I used a 200 pixel, soft-edged brush to do this

Turn the visibility of the "Bark" layer off (clicking the eye icon next to the layer thumbnail will do this). Go to the Channels palette, select the channel with the best contrast, and duplicate this channel into a new document.

Apply a 2 pixel Gaussian Blur to your new document and then adjust the Levels as in the screengrab below. Save as "Displace.psd."

Reselect the "RGB" channel (so all channels are selected and the image is now back in color) and return to the Layers palette. Make the "Bark" layer visible and select it. Go to Filter > Distort > Displace. Set the Horizontal and Vertical scale to 1 (or try other values), select Stretch To Fit and Repeat Edge Pixels. Set the Layer Blending Mode to Multiply. You can see how it's distorted over parts of the face.

It hasn't quite put it in the right place so move the "Bark" down the face until the distortions match the face. Use this wrinkle (circled) as a guide as to where to put it.

Duplicate the "Bark" layer twice. Set one to Multiply with an Opacity of 100%. Set the other to Normal at 40% Opacity. Position in the Layer hierarchy as in the image below.

Command-click on the "Face" Layer to create a selection. Select the "Bark Normal 40% Layer" and go to Layer > Layer Mask > Reveal selection. Repeat this for the "Bark Multiply" Layer. Zoom into 300% and use the Pen tool to draw around the eyes and the mouth. Add a rough edge to the top of the mouth. Press Commmand-click on the Path thumbnail to create a selection.

Select the "Bark Normal 40%" Layer Mask thumbnail to work directly on the Mask. Select black as the background color and then delete the selection from the Layer Mask. Repeat this process for the "Bark Multiply" Layer.

Go to Layer > New Adjustment Layer > Curves and set up as shown below. Then fill the Adjustment Layer Mask with black so the effects aren't visible.


Turn off the visibility of the "Bark" Layers and use the Pen tool to draw a paths around the hard edges we need to mask. The bottom of the nose and cheek lines are good examples. Command-click on the Path thumbnail to create a selection from it.

Select a soft-edged (0% Hardness) brush, loaded with white (as the foreground color) and set to 16% Opacity. Paint directly on the Layer Mask. Press Command + H to hide selection the, if it helps. Draw over several times, applying more at the shadow source and less as you get further from the harsher shadows.

Draw around other features which produce hard lines such as the bottom lip. Draw the Shadows in the same manner.

Create a selection from the "Face" layer by Command-clicking the layer thumbnail. Draw all the shadows in...

...Changing the Brush size to suit size of the area you're treating. Around the lip for example, use a small brush.

Turn the "Bark" layers off to see the key areas of shadow. You can still work on the Mask with the face showing. I flick between working with the "Bark" visible and invisible.

In order to soften or erase any shadows that you're not happy with, change the brush color to black and draw on the mask in the same way as before. Keep working on the Mask until you get it right.

Whilst drawing on the Mask, you should be changing your brush size and the opacity to suit the shadow. For a big gradual shadow you'll want around a 300 pixel brush set to 16% Opacity, all the way down to 18 pixels and increasing the opacity to suit. Finally, apply a 0.6 pixel Gaussian Blur to the Adjustment Curve Layer Mask to soften the hard edges.

Duplicate the "Bark" Layer that sits beneath the "Face" Layer. Set them up so they are the same as the top Bark layers, one Normal at 40% opacity, one Multiply at 100%. Then under those two layers create a new layer and fill it with C=61%, M=66%, Y=66%, and K=62%.

Create a selection from the "Face" Layer (Command-click the Layer thumbnail) and go to Select > Inverse. Then go to Select > Modify > Expand. Give it a 1 pixel expansion. Select the Curves Adjustment Layer Mask and Fill the selection with 20% black.

Create a selection from the Eyes/Mouth Path you made earlier. Add some shadows by drawing on the Curves Adjustment Layer Mask.

To further fuse the elements together, and to grade the image, add a Curves and a Hue/Saturation Adjustment Layer to the top of the Layers hierarchy.


Flatten the image and go to Filter > Liquify. Select the Bloat tool and set up roughly how it is in the image below. We want to add a 3D quality to the areas such as cheeks, nose, and forehead. Select an appropriate Brush size for each of these areas and click on each a few times rather than dragging the brush around.

You can always add some real world effects such as leaves and bugs to the final image - go nuts. This technique works for applying any texture to any surface, for example you could make a brand new Mercedes SLK rusty and riveted, or make a house out of skin. Go have fun whilst you perfect your craft. You can view the final image below or view a larger version here.
Labels: Photoshop Tutorial
Posted by it's me.. at 4:01 AM 0 comments
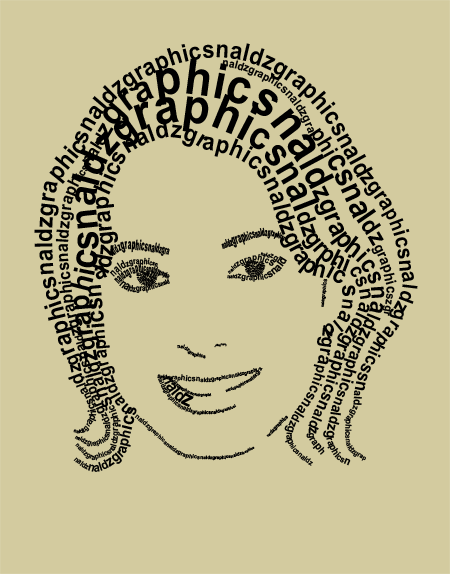
As I was thinking of making more advance tutorials, maybe its time to make a quick simple tutorials where beginners can easily figure how it was done. Here is a simple tutorial for beginners. In this tutorial you’ll gonna learn how to create a Simple Text Portrait in Photoshop. You will learn how to make a text follow into a path with the use of Pen Tool (P) in more artistic way. Here’s a quick look on the final result
First we need to get a Stock photo to start. This girl is good for our tutorial. You can download it HERE. After you download it. Put it in Photoshop and Name it to “GUIDE”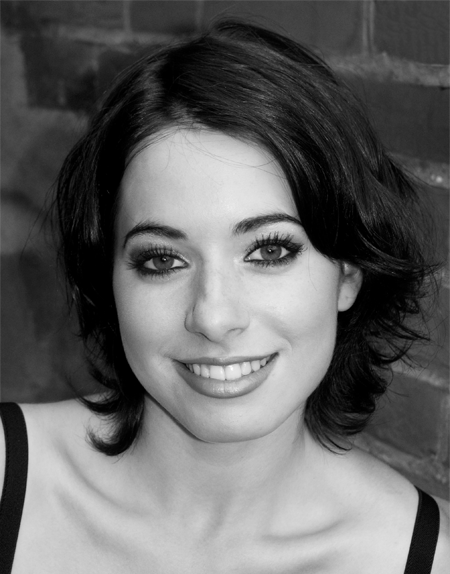
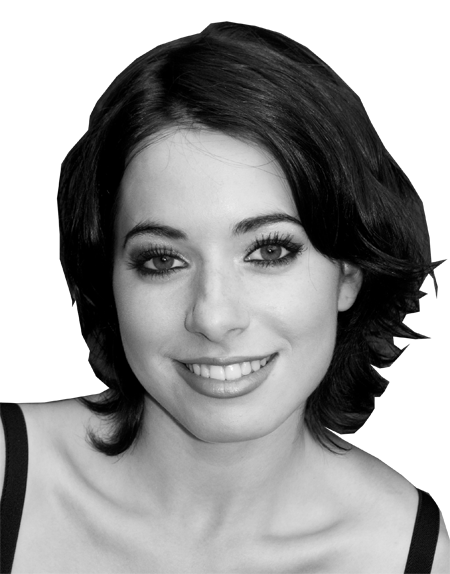
Once you download, Remove the background using Polygonal Lasso Tool (L).
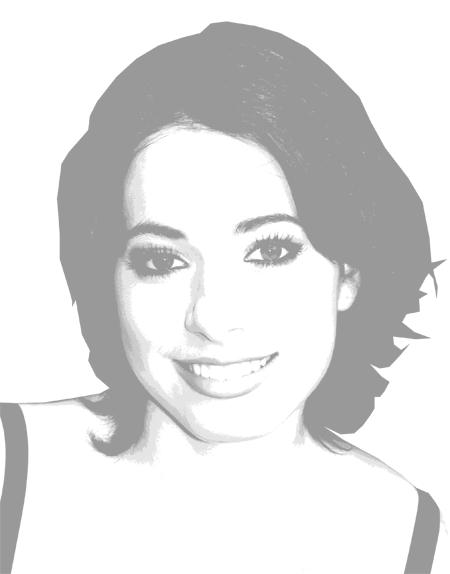
Lets adjust the image Brightness and Contrast. Copy the settings below
Now lets posterize it a bit. Go to Image>Adjustments>Posterize. Then set the Level to 5. One its done set the image Opacity to 40 so we can easily see the path later on once we use Pen Tool (P).
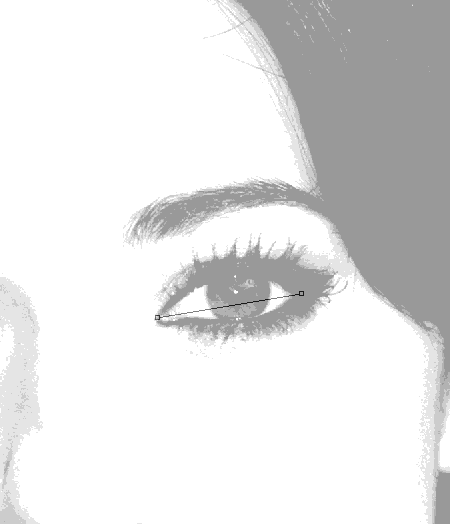
Choose Pen Tool (P). Start creating a path from left to right. See image below.
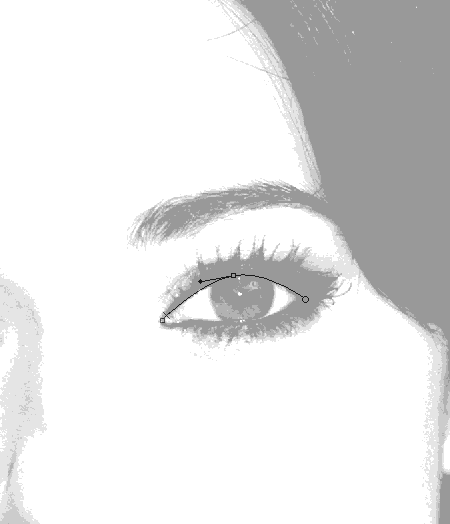
Now Lets add an anchor point on the center of the path. Right Click on the Pen Tool (P) in the toolbar then choose Add Anchor Point Tool. Add an anchor point on the center then hold Left Click on your Mouse then drag it Upward.
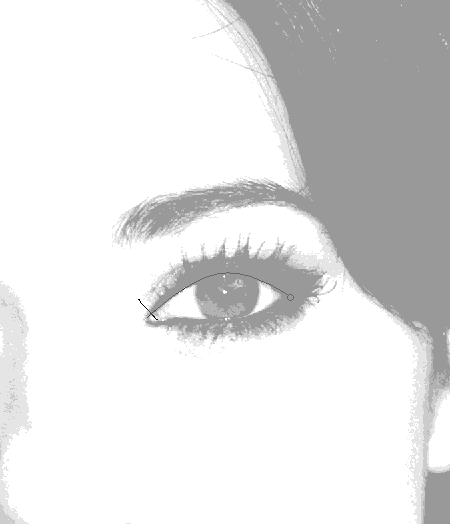
This time choose Horizontal Type Tool (T) then click on the left side of the path. Its the first point when we start creating our path. After you click the first point of our path It must look like this
Now Start typing a text. I use naldzgraphics on this sample repeatedly:).
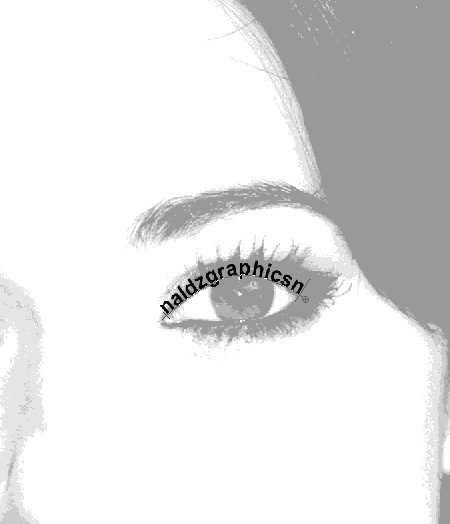
Lets adjust the size of the fonts so it will occupied the darker part of our image since we are using the darker part of the image as our guide to create our portrait.
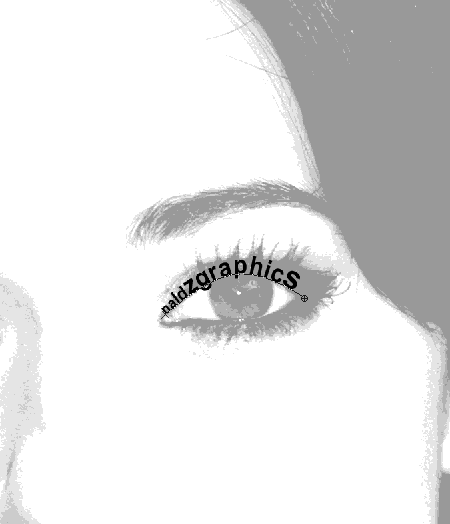
To work on the eye, Choose Ellipse Tool (U) and start creating a circle inside the eye. Once your done adjust the circle using Direct Selection Tool (A). Now we have just made a path on the eye.
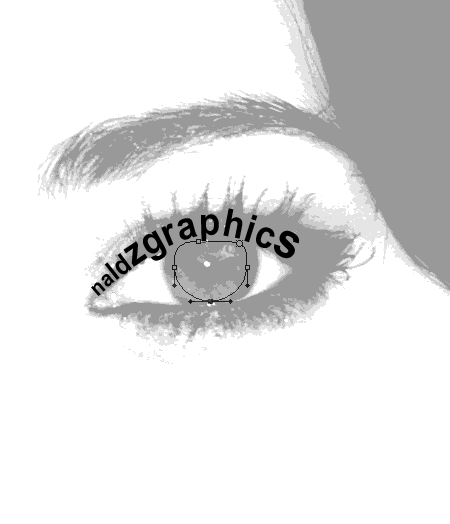
Choose Horizontal Type Tool (T) again. Click on the upper right of the path and start typing a text. It will look like this.

Now you learn how to create a path using Pen Tool repeat the same process on the nose,mouth and hair. Again make sure to use the darker part on the image as the guide on making the path:) Once your finish, close the “GUIDE” Layer. On the Background layer use #d3cb9f color. Use Paint Bucket Tool (G) to apply the color. And we’re finish:) Again Congrats!!!

Also Adding color gives better effect.You can play what ever color you want on your portrait. Here I just use a simple color using only more on red.
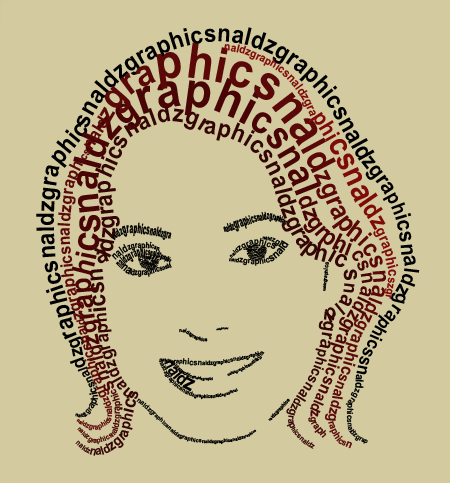
I hope this tutorial help you.
from this source : http://naldzgraphics.net/tutorials/how-to-create-a-simple-face-text-portrait-in-photoshop/
Labels: Photoshop Tutorial
Posted by it's me.. at 2:47 AM 0 comments